Thursday, December 23, 2010

Make a News Paper Style Drop Caps

Do you have read a magazine or newspaper? the answer is surely have. In this opportunity I will study concerning how do to make an alphabet which in printing bigger in comparing with other ordinary alphabet such as in writing in a newspaper or magazine. For example :
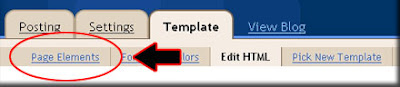
Many the way to back up the data in Widgets / page element, but I'm limitation of time to comment it in detail, hence I will try explain just two way, that is backing up directly from Page element and also backup from template source code.


To make the article like that is easy very, you are only adding a few CSS codes when you post an article. However you post an article, you must choose edit html tab tab, don't at compose tab tab. This is the codes :


<span style="float:left;color: #000;background:#fff;line-height:80px; padding-:1px 5px 0 0; font-family:times; font-size:100px;">First alphabet</span>
Example. however you must remember when you add this code you must at Edit HTml tab :


<span style="float:left;color: #000;background:#fff;line-height:80px; padding-top:1px; padding-right:5px; font-family:times; font-size:100px;">M</span>any the way to back up the data in Widgets / page element, but I'm limitation of time to comment it in detail, hence I will try explain just two way, that is backing up directly from Page element and also backup from template source code. This is the result : Many the way to back up the data in Widgets / page element, but i'm limitation of time to comment it in detail, hence I will try explain just two way, that is backing up directly from Page element and also backup from template source code.
To be you more understanding, I will elaborate concerning above codes : color: #000 : this is the code for alphabet color, #000 is code for black color, you can alter this code with your color. background:#fff : this is the code for background color of first alphabet (firt alphabet). #fff is code for white color, you can alter this code with you want color. padding:1px 5px 0 0 : this the code dor padd, 1px--> padding for top, 5px psdding for right, 0 --> padding for bottom, 0 --> padding for left. You can alter the value of padding with other value. font-family:times : this code is for style of font, you can alter the font with font what you want, example verdana, georgia and etc. Font-size:100px : this code is for size of font, you can alter the size of font.
This is several example :


<span style="float:left;color: #0C3259;background:#BCBBBB;line-height:80px; padding:1px 5px 0 0; font-family:times; margin: 0px 5px 5px 0px; font-size:100px;">First alphabet</span>
The result : M any the way to back up the data in Widgets / page element, but I'm limitation of time to comment it in detail, hence I will try explain just two way, that is backing up directly from Page element and also backup from template source code.


<span style="float:left;color: #0C3259;background:#77FD8D;line-height:80px; padding:0 5px 0 5px; border: 2px solid #606160; border-right: 2px solid #606160; border-bottom: 2px solid #606160; font-family:georgia; margin: 0px 5px 5px 0px; font-size:100px;">First alphabet</span>
The result : M any the way to back up the data in Widgets / page element, but i'm limitation of time to comment it in detail, hence I will try explain just two way, that is backing up directly from Page element and also backup from template source code.


<span style="float:left;color: #04440E;background:#E0F5FD;line-height:80px; padding:0 13px 0 10px; border: 2px solid #057B19; border-right: 2px solid #057B19; border-bottom: 2px solid #606160; border-top: 1px solid #057B19; border-left: 1px solid #057B19; font-family:arial; font-style: italic; margin: 0px 5px 5px 0px; font-size:100px;">First alphabet</span>
The result : M any the way to back up the data in Widgets / page element, but i'm limitation of time to comment it in detail, hence I will try explain just two way, that is backing up directly from Page element and also backup from template source code. And please create any style with your.
Except the above step, you can create a News Paper Style Drop Caps with other way. this is more then easy. this is the steps: Step #1 :

  1. Login to blogger with your ID
  2. After entering the dashboard page , click Layout. Please saw the picture :
  3. Then click edit HTML tab. Please saw the picture :
  4. Click the Download full template link. Save your template:
  5. Go to your template code
  6. Copy and paste the following code above of ]]></b:skin>
  7. Click Save Template button
  8. Step #1 is finish.

Step #2 :
  1. Click Setting tab.
  2. Click formatting tab.
  3. Go to lower side. you will find a blank text are beside Post Template. Fill that blank text area with this code :
  4. <span class="magazine"> </span>
  5. Click Save settings button.
  6. finish


How to post your article?

When you post your article, choose tab. and you will see the code below :


<span class="magazine"> </span>


Place the first alphabet between <span class="magazine"> and </span>

Example :
<span class="magazine">M</span>any the way to back up the data in Widgets / page element, but I'm limitation of time to comment it in detail, hence I will try explain just two way, that is backing up directly from Page element and also backup from template source code.
Publish your article and finish. Please see the result. I think this is enough, see you at my next tips.

Add Google Talk to Blog

google talk
I'm sure you are surely knew what is the Google Talk, with Google talk you can send instant messages, make voice calls, leave voice mail messages, transfer files and etc, however of course must with other Google user. Do you know, now you can add Google talk to your blog? not yet known its way? please follow the steps following :


  1. Login to blogger with your ID.
  2. After entering the dashboard page , click Layout. Please saw the picture :
  3. layout
  4. Click at Page Element tab. See the picture below :
  5. page element
  6. Click at Add a Page element.
  7. After emerging pop up window , Click add to blog button for the things HTML/JavaScript. See the picture following :
  8. javascript
  9. Copy and paste the code below into available column :
  10. Click   save changes   
  11. Finish. Please see the result.

Now you have a Google Talk at your blog. Or maybe you still confused with the step above? don't worry i have an easy way to do it, just click the button below, login to your blog and the widget will be add to your blog automatically:


See you next time at my new post brother.

Make a Post Summary (Read more Function)

If you are a beginner, possible you'd feel to surprise when seeing the articles in my blog presenting only shares first paragrap or second paragrap, and to read for full article, you must click Read more... link. Alright.. please don't feel surprise, i will discuss about this now.

The function like that called Post Summary. You can make a post summary function with add a little code to your template code. But this code is for new blogger template (beta) and does not work at classic template.

Please follow the steps below :

Step #1 :

  1. Login to blogger with your ID
  2. In the dashboard page , click Layout.
  3. Then click edit HTML tab.
  4. Click the Download full template link. Save your template (very important)
  5. Please mark the little box beside Expand Widget Templates. Wait for a moment.

    expand-widget.png
  6. Go to your template code, and find the code like this :
  7. Delete the above code and change with this code :
  8. Click Save Template button
  9. Step #1 is done.


Step #2 :
  1. Click Setting tab.
  2. Click formatting tab.
  3. Go to lower side. you will find a blank text are beside Post Template. Fill that blank text area with this code :
  4. Click Save settings button.
  5. Step #2 is done.


How to post your article?

When you post your article, choose photo-posting_03.gif tab. and you will see the code below :


<span class="fullpost">


</span>


Place the first paragraps above of :

<span class="fullpost">


and place the rest of paragrap under of :

<span class="fullpost">


and above of :

</span>


and then publish your post. Done.


If you still feel confuse, this is the example how to place your article:

Lorem ipsum dolor sit amet, consectetuer adipiscing elit. Quisque sed felis. Aliquam sit amet felis. Mauris semper, velit semper laoreet dictum, quam diam dictum urna, nec placerat elit nisl in quam. Etiam augue pede, molestie eget, rhoncus at, convallis ut, eros. Aliquam pharetra. Nulla in tellus eget odio sagittis blandit. Maecenas at nisl. Nullam lorem mi, eleifend a, fringilla vel, semper at, ligula. Mauris eu wisi. Ut ante dui, aliquet nec, congue non, accumsan sit amet. (this will show in front of your blog)
<span class="fullpost">


Nulla in tellus eget odio sagittis blandit. Maecenas at nisl. Nullam lorem mi, eleifend a, fringilla vel, semper at, ligula. Mauris eu wisi. Ut ante dui, aliquet nec, congue non, accumsan sit amet, lectus. Mauris et mauris. Duis sed massa id mauris pretium venenatis. Suspendisse cursus velit vel ligula. Mauris elit. Donec neque. Phasellus nec sapien quis pede facilisis suscipit. Aenean quis risus sit amet eros volutpat ullamcorper. Ut a mi. Etiam nulla. Mauris interdum. . (this will show if visitor click read more)
</span>


At front page of your blog, will show just like this :

Lorem ipsum dolor sit amet, consectetuer adipiscing elit. Quisque sed felis. Aliquam sit amet felis. Mauris semper, velit semper laoreet dictum, quam diam dictum urna, nec placerat elit nisl in quam. Etiam augue pede, molestie eget, rhoncus at, convallis ut, eros. Aliquam pharetra. Nulla in tellus eget odio sagittis blandit. Maecenas at nisl. Nullam lorem mi, eleifend a, fringilla vel, semper at, ligula. Mauris eu wisi. Ut ante dui, aliquet nec, congue non, accumsan sit amet. Read more...

The last, if you try this hack and you not succes, don't be panic. upload your backup template, and it's will be back to template code before you do edit.

Allright my friend, i think this enought. See you at my next post.

How to change the template

At this opportunity, I will discuss about how to change template in blogger.com. First matter to be in considering in changing template is you have to make a backing up your old template, this good for if you feeling not match with your newly template. if you not yet known the way to back up template, please read at the post how to backup template, and also don't forget to back up your widgets (this is very important). For back up your widgets, please read at the post how to backup your widgets.


To change the template, of course you must had a new template to uploaded. If still not yet had, you can download for free template at Bloger templates or at other sites. Have ready for changing your old template with newly template? Please follow the steps below :

  1. Login to blogger with your ID
  2. After entering the dasboard page , click Layout.
  3. Then click edit HTML tab
  4. Click the Download full template link. Save your template:
  5. Click browse... button. Choose your new template. and then click Upload button.
  6. browse button image
  7. Usually go out commemoration that your data in your widgets will be delete forever (so don't forget to backup your widgets).
  8. For example, the image will show like this :
  9. Click at Convirm & Save button.
  10. Finish. Please look he result.


Now you have had the new face. However of course your template is still empty, So next step is inserting your widgets manually through page element menu.

Enjoy your new blog face.

How to backup the template

If you were interested to replace new template or want to redesign your template, It is best to backup your template before you changing any code. this step was as prevented to reduce the fatal risk if the mistake happening in redesign or changing your template. For you that did not yet know how to backup your template, please followed steps below :


  1. Login to blogger with your ID
  2. After entering the dasboard page , click Layout. Please saw the picture :
  3. Then click edit HTML tab. Please saw the picture :
  4. Click the Download full template link. Please saw the picture :
  5. After you click Download full template link, then will emerge new window just to download. Click the Save button. Saw the picture :
  6. You could choose this data would in kept where and with what file name what, Afterwards ended with click of the Save button. Please saw the picture :
  7. Finish.


Now you had back up the template, if next time you needed him, you could use this came back. But must be known, backing up the template like steps above could not back up the data inside widget. How to back up the data widget? This would in discussed in next post.

See you at my next post .