Thursday, December 23, 2010

Make a News Paper Style Drop Caps

Do you have read a magazine or newspaper? the answer is surely have. In this opportunity I will study concerning how do to make an alphabet which in printing bigger in comparing with other ordinary alphabet such as in writing in a newspaper or magazine. For example :
Many the way to back up the data in Widgets / page element, but I'm limitation of time to comment it in detail, hence I will try explain just two way, that is backing up directly from Page element and also backup from template source code.


To make the article like that is easy very, you are only adding a few CSS codes when you post an article. However you post an article, you must choose edit html tab tab, don't at compose tab tab. This is the codes :


<span style="float:left;color: #000;background:#fff;line-height:80px; padding-:1px 5px 0 0; font-family:times; font-size:100px;">First alphabet</span>
Example. however you must remember when you add this code you must at Edit HTml tab :


<span style="float:left;color: #000;background:#fff;line-height:80px; padding-top:1px; padding-right:5px; font-family:times; font-size:100px;">M</span>any the way to back up the data in Widgets / page element, but I'm limitation of time to comment it in detail, hence I will try explain just two way, that is backing up directly from Page element and also backup from template source code. This is the result : Many the way to back up the data in Widgets / page element, but i'm limitation of time to comment it in detail, hence I will try explain just two way, that is backing up directly from Page element and also backup from template source code.
To be you more understanding, I will elaborate concerning above codes : color: #000 : this is the code for alphabet color, #000 is code for black color, you can alter this code with your color. background:#fff : this is the code for background color of first alphabet (firt alphabet). #fff is code for white color, you can alter this code with you want color. padding:1px 5px 0 0 : this the code dor padd, 1px--> padding for top, 5px psdding for right, 0 --> padding for bottom, 0 --> padding for left. You can alter the value of padding with other value. font-family:times : this code is for style of font, you can alter the font with font what you want, example verdana, georgia and etc. Font-size:100px : this code is for size of font, you can alter the size of font.
This is several example :


<span style="float:left;color: #0C3259;background:#BCBBBB;line-height:80px; padding:1px 5px 0 0; font-family:times; margin: 0px 5px 5px 0px; font-size:100px;">First alphabet</span>
The result : M any the way to back up the data in Widgets / page element, but I'm limitation of time to comment it in detail, hence I will try explain just two way, that is backing up directly from Page element and also backup from template source code.


<span style="float:left;color: #0C3259;background:#77FD8D;line-height:80px; padding:0 5px 0 5px; border: 2px solid #606160; border-right: 2px solid #606160; border-bottom: 2px solid #606160; font-family:georgia; margin: 0px 5px 5px 0px; font-size:100px;">First alphabet</span>
The result : M any the way to back up the data in Widgets / page element, but i'm limitation of time to comment it in detail, hence I will try explain just two way, that is backing up directly from Page element and also backup from template source code.


<span style="float:left;color: #04440E;background:#E0F5FD;line-height:80px; padding:0 13px 0 10px; border: 2px solid #057B19; border-right: 2px solid #057B19; border-bottom: 2px solid #606160; border-top: 1px solid #057B19; border-left: 1px solid #057B19; font-family:arial; font-style: italic; margin: 0px 5px 5px 0px; font-size:100px;">First alphabet</span>
The result : M any the way to back up the data in Widgets / page element, but i'm limitation of time to comment it in detail, hence I will try explain just two way, that is backing up directly from Page element and also backup from template source code. And please create any style with your.
Except the above step, you can create a News Paper Style Drop Caps with other way. this is more then easy. this is the steps: Step #1 :

  1. Login to blogger with your ID
  2. After entering the dashboard page , click Layout. Please saw the picture :
  3. Then click edit HTML tab. Please saw the picture :
  4. Click the Download full template link. Save your template:
  5. Go to your template code
  6. Copy and paste the following code above of ]]></b:skin>
  7. Click Save Template button
  8. Step #1 is finish.

Step #2 :
  1. Click Setting tab.
  2. Click formatting tab.
  3. Go to lower side. you will find a blank text are beside Post Template. Fill that blank text area with this code :
  4. <span class="magazine"> </span>
  5. Click Save settings button.
  6. finish


How to post your article?

When you post your article, choose tab. and you will see the code below :


<span class="magazine"> </span>


Place the first alphabet between <span class="magazine"> and </span>

Example :
<span class="magazine">M</span>any the way to back up the data in Widgets / page element, but I'm limitation of time to comment it in detail, hence I will try explain just two way, that is backing up directly from Page element and also backup from template source code.
Publish your article and finish. Please see the result. I think this is enough, see you at my next tips.

Add Google Talk to Blog

google talk
I'm sure you are surely knew what is the Google Talk, with Google talk you can send instant messages, make voice calls, leave voice mail messages, transfer files and etc, however of course must with other Google user. Do you know, now you can add Google talk to your blog? not yet known its way? please follow the steps following :


  1. Login to blogger with your ID.
  2. After entering the dashboard page , click Layout. Please saw the picture :
  3. layout
  4. Click at Page Element tab. See the picture below :
  5. page element
  6. Click at Add a Page element.
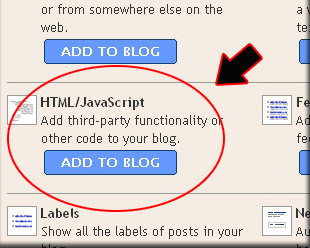
  7. After emerging pop up window , Click add to blog button for the things HTML/JavaScript. See the picture following :
  8. javascript
  9. Copy and paste the code below into available column :
  10. Click   save changes   
  11. Finish. Please see the result.

Now you have a Google Talk at your blog. Or maybe you still confused with the step above? don't worry i have an easy way to do it, just click the button below, login to your blog and the widget will be add to your blog automatically:


See you next time at my new post brother.

Make a Post Summary (Read more Function)

If you are a beginner, possible you'd feel to surprise when seeing the articles in my blog presenting only shares first paragrap or second paragrap, and to read for full article, you must click Read more... link. Alright.. please don't feel surprise, i will discuss about this now.

The function like that called Post Summary. You can make a post summary function with add a little code to your template code. But this code is for new blogger template (beta) and does not work at classic template.

Please follow the steps below :

Step #1 :

  1. Login to blogger with your ID
  2. In the dashboard page , click Layout.
  3. Then click edit HTML tab.
  4. Click the Download full template link. Save your template (very important)
  5. Please mark the little box beside Expand Widget Templates. Wait for a moment.

    expand-widget.png
  6. Go to your template code, and find the code like this :
  7. Delete the above code and change with this code :
  8. Click Save Template button
  9. Step #1 is done.


Step #2 :
  1. Click Setting tab.
  2. Click formatting tab.
  3. Go to lower side. you will find a blank text are beside Post Template. Fill that blank text area with this code :
  4. Click Save settings button.
  5. Step #2 is done.


How to post your article?

When you post your article, choose photo-posting_03.gif tab. and you will see the code below :


<span class="fullpost">


</span>


Place the first paragraps above of :

<span class="fullpost">


and place the rest of paragrap under of :

<span class="fullpost">


and above of :

</span>


and then publish your post. Done.


If you still feel confuse, this is the example how to place your article:

Lorem ipsum dolor sit amet, consectetuer adipiscing elit. Quisque sed felis. Aliquam sit amet felis. Mauris semper, velit semper laoreet dictum, quam diam dictum urna, nec placerat elit nisl in quam. Etiam augue pede, molestie eget, rhoncus at, convallis ut, eros. Aliquam pharetra. Nulla in tellus eget odio sagittis blandit. Maecenas at nisl. Nullam lorem mi, eleifend a, fringilla vel, semper at, ligula. Mauris eu wisi. Ut ante dui, aliquet nec, congue non, accumsan sit amet. (this will show in front of your blog)
<span class="fullpost">


Nulla in tellus eget odio sagittis blandit. Maecenas at nisl. Nullam lorem mi, eleifend a, fringilla vel, semper at, ligula. Mauris eu wisi. Ut ante dui, aliquet nec, congue non, accumsan sit amet, lectus. Mauris et mauris. Duis sed massa id mauris pretium venenatis. Suspendisse cursus velit vel ligula. Mauris elit. Donec neque. Phasellus nec sapien quis pede facilisis suscipit. Aenean quis risus sit amet eros volutpat ullamcorper. Ut a mi. Etiam nulla. Mauris interdum. . (this will show if visitor click read more)
</span>


At front page of your blog, will show just like this :

Lorem ipsum dolor sit amet, consectetuer adipiscing elit. Quisque sed felis. Aliquam sit amet felis. Mauris semper, velit semper laoreet dictum, quam diam dictum urna, nec placerat elit nisl in quam. Etiam augue pede, molestie eget, rhoncus at, convallis ut, eros. Aliquam pharetra. Nulla in tellus eget odio sagittis blandit. Maecenas at nisl. Nullam lorem mi, eleifend a, fringilla vel, semper at, ligula. Mauris eu wisi. Ut ante dui, aliquet nec, congue non, accumsan sit amet. Read more...

The last, if you try this hack and you not succes, don't be panic. upload your backup template, and it's will be back to template code before you do edit.

Allright my friend, i think this enought. See you at my next post.

How to change the template

At this opportunity, I will discuss about how to change template in blogger.com. First matter to be in considering in changing template is you have to make a backing up your old template, this good for if you feeling not match with your newly template. if you not yet known the way to back up template, please read at the post how to backup template, and also don't forget to back up your widgets (this is very important). For back up your widgets, please read at the post how to backup your widgets.


To change the template, of course you must had a new template to uploaded. If still not yet had, you can download for free template at Bloger templates or at other sites. Have ready for changing your old template with newly template? Please follow the steps below :

  1. Login to blogger with your ID
  2. After entering the dasboard page , click Layout.
  3. Then click edit HTML tab
  4. Click the Download full template link. Save your template:
  5. Click browse... button. Choose your new template. and then click Upload button.
  6. browse button image
  7. Usually go out commemoration that your data in your widgets will be delete forever (so don't forget to backup your widgets).
  8. For example, the image will show like this :
  9. Click at Convirm & Save button.
  10. Finish. Please look he result.


Now you have had the new face. However of course your template is still empty, So next step is inserting your widgets manually through page element menu.

Enjoy your new blog face.

How to backup the template

If you were interested to replace new template or want to redesign your template, It is best to backup your template before you changing any code. this step was as prevented to reduce the fatal risk if the mistake happening in redesign or changing your template. For you that did not yet know how to backup your template, please followed steps below :


  1. Login to blogger with your ID
  2. After entering the dasboard page , click Layout. Please saw the picture :
  3. Then click edit HTML tab. Please saw the picture :
  4. Click the Download full template link. Please saw the picture :
  5. After you click Download full template link, then will emerge new window just to download. Click the Save button. Saw the picture :
  6. You could choose this data would in kept where and with what file name what, Afterwards ended with click of the Save button. Please saw the picture :
  7. Finish.


Now you had back up the template, if next time you needed him, you could use this came back. But must be known, backing up the template like steps above could not back up the data inside widget. How to back up the data widget? This would in discussed in next post.

See you at my next post .

How to do blog settings in blogger

The first important thing you should do to make your blog in blogger have the best performance is to do some Settings. As your inspirations on how to do blog settings in blogger, the following, Blogspot Tutorial writes how to setup blog in blogger:
* Please login to blogger with your ID
* Click Setting
blog settings * You will see the menu tabs containing things to setup:
settings tab

Basic

Some settings in Basic menu:
  • Blog Tools: Import blog → this is the facility to import data from your computer (this is usually done when transferring blog). Don’t click it, let it be as it is. Export blog > this is the facility to export blog from blogger server to your computer. This facility is also called as Backup blog facility. You are suggested to create blog backup at least once a week. The backup data will be useful and helpful when sometime you want to transfer blogs in blogger, or you also can use it when you want to do a blog migration from blogger to another blog machine such as Wordpress, etc. Delete blog > this facility is to delete your blog. Don’t ever click it if you don’t want to delete your blog.
  • Title: Fill out with the title of your blog, e.g. My personal blog
  • Description: Fill out with your blog description, e.g. Notes of My Unique Life.
  • Add your blog to our listing?: You’re suggested to choose Yes option.
  • Let search engines find your blog?: Choose Yes, so your blog will be indexed by search engines such as Google, Yahoo, and Bing.
  • Show quick editing on your blog?: You may choose Yes or No.
  • Show email post links?: It will be an icon of email with which your visitors can easily email your posts to their friends. Choose Yes, if you want, or No if you don’t want this facility to appear on your blog.
  • Adult contents?: If your blog then will contain anything about adults including in the forms of writing, images, or videos of such as sexy girls, etc, you can choose Yes. However, if your blog then will contain anything to be accessed safely by kids and all ages, you should choose No. NB: If you choose Yes, there will be an adult content warning when your blog is accessed.
  • Select Post Editor: This is to select post editor in your blog. Updated Editor → This is the latest post editor that Blogger has with new features included such as the More button to cut off your articles, and more. Old Editor → This is the old post editor that Blogger has, but you can still use it if you feel more comfortable with this old editor, because there are some features at this old editor that are not included in the Updated Post Editor. Hide Compose Mode → This is an option for those who are familiar with HTML because this option will hide the compose mode in your post editor. Don’t use this option if you are not familiar with the HTML coding.
  • Enable transliteration?: Select Enable if you want your post editor allow you to translate to Hindi, Kannada, Malayalam, Tamil, or Telugu. Select disable if you want your post editor not to allow you the transliteration.
  • End settings on Basic menu by clicking SAVE SETTINGS.

Publishing

This is to change the domain name of your blog in blogger with your own domain name, e.g. http://yourblogname.blogspot.com into http://yourblogname.com.
For temporary, don’t do anything at this Publishing menu! Tutorial about custom domain in blogger can be read at How to use Custom Domain in Blogger.

Formatting

Some settings in the Formatting menu:
  • Show at most: type the number of posts you want to display on your blog homepage, e.g. 5. Next to number of posts option, there is dropdown menu allow you to choose Posts or Days. Just choose posts, which means your blog homepage will show 5 posts.
  • Date Header Format: Choose how the date format you would like to display above your posts.
  • Archive Index Date Format: Choose the date format for your archive index.
  • Timestamp Format: Choose the time format you would like to display. This is the time when a post is published on your blog.
  • Time Zone: Just choose the time zone where you are.
  • Language: Choose the language you want to use in your blog.
  • Convert line breaks: this is the facility of automated line breaks when you hit enter during typing an article in the post editor. This facility is used when you think you will not post or write the codes such as HTML codes, etc in the future. But if you think you will post about HTML codes and include the codes in your posts, you should choose No, for instance, if your blog talks about the tutorials about HTML, PHP, etc.
  • Show Title Field: You may choose Yes or No.
  • Show link fields: You may choose Yes or No.
  • Enable Float alignment: Choose Yes, so you can arrange the position of your post both images and texts. But if you think this option will disturb the display of your blog, just choose No.
  • Post Template: This is the facility to create any text or code to appear each time you write a new post. It is usually used to create blog signature that will always appear in every post you create without having to type manually each time you create a new post.
  • End the settings on Formatting menu by clicking SAVE SETTINGS

Comments

Some settings in the Comments menu:
  • Comments: Choose Show if you want your posts commented by your visitors, or choose Hide if you don’t want your posts commented by your visitors.
  • Who can comment? : Anyone – includes anonymous users  → choose this option if you want everyone can comment on your blog including the Anonymous users or those without identity. Registered users –includes OpenID → Only users that are registered who can comment on your blog, i.e. those who have accounts in Google, Live Journal, Wordpress, Type pad, AIM, and or OpenID. Users with Google accounts → Those who can comment on your blog are those who have Google accounts. Only members of this blog → Only members of your blog who can comment. A certain community usually chooses this option such as educational community, etc.
  • Comment form placement: Full page → the page of your blog will switch to the comment form page if you choose this option. Pop-up window → your comment box will appear as pop-up window, so your blog is still displayed. Embedded below post → your comment box will directly be displayed under post, so your visitors can comment directly without clicking a Post Comment link. Bloggers like most the comment box is embedded below post.
  • Comments Default for posts: Choose New posts Have Comments if you want your articles have the comment box, but you can disable this when you create a post. Choose New Posts Do not have comments if you want your posts don’t have comment box, but you can add it when you create a post.
  • Backlinks: Choose Show if you want to display links to the websites that link to your articles.
  • Backlinks Default for Posts: choose New posts have backlinks if you want your articles have backlinks, and choose new posts do not have backlinks if you want your articles do not have backlinks.
  • Comment Timestamp Format: choose the date format you want to display.
  • Comment Form Message: type your massages to be displayed above the comment box, e.g. please comment freely but keep it polite by not doing spam.
  • Comment Moderation: choose Always if you want to display any comment after moderation. Only on posts older than …days. Choose this option if you want to display any comment on your selected posts based on the age you have determined, e.g. 15 days, etc. Choose Never if you want to display any comment without a moderation. Don’t forget to type your email address in the available field to get notifications when someone of non-member comments on your posts. Or leave blank if you don’t need the notifications.
  • Show word verification for comments?: choose Yes if you want to display word verification that will require commentators to enter before publishing their comments. It is to avoid a spam comment such as the robot spam script that can comment on your automatically and frequently. Anyway, visitors usually don’t like the word verification for inconvenience reason. Choose No when you don’t want the word verification displayed, although this option allows spasm like robot spam scripts to place their comments.
  • Show profile images on comments?: Choose Yes if you want the profile images of commentators to be displayed, and choose No if otherwise.
  • Comment Notification Email: Enter the email addresses up to ten emails that you want to send comment notifications.
  • End settings on Comment menu by clicking SAVE SETTINGS.

Archiving

Some settings on Archiving menu:
  • Archive frequency: choose how your blog archives will be displayed on your blog whether you want the archives arranged No Archive, Daily, Weekly, or Monthly. You had better choose Monthly.
  • Enable Post Pages?: Choose Yes or No.
  • End settings on Archiving menu by clicking SAVE SETTINGS.

Site Feed

Some settings on Site Feed menu:
  • Allow Blog Feeds: Choose either None, Short, or Full. You had better Full at this option.
  • Post Feed Redirect URL: If you have burned your post feed, you can type the URL of your feed here, for instance, you can burned post feed at Feedburner, etc. Leave it blank if you don’t have. We will specifically discuss about Feed burner at next post.
  • Post Feed Footer: You can fill any code here that will be displayed in the footer of your post feed such as advertisements, etc. Leave it blank if you don’t understand.
  • End settings on Site Feed menu by clicking SAVE SETTINGS.

Email & Mobile

In order to be able to post an article on your blog, not only do you use the post editor, but you also have other ways, e.g. through email and mobile.
Some setting on Email & Mobile menu:
BlogSend Address: Type email addresses up to ten emails separated by comma (,) to which you want to send notification when posting an article.
Email Posting Address: Create a blogger email address (known as Mail2Blogger) from which you can post articles directly to your blog when you send an email to this blogger email address, e.g. if you have an email address at example@gmail.com, then you can create blogger email address at example.post@blogger.com or example.blog@blogger.com, or anything else you think very good, but you should remember that it’s a secret to avoid other people can post through it.
To activate this feature, you should choose Publish emails immediately, meaning that each time you send emails to your blogger email address, the content of your email will be posted as blog post on your blog. If you choose Save emails as draft posts, the emails will not be published automatically but will be stored in the draft posts.
However, if you don’t want to publish through email, choose Disable. For security reason, many choose this option.
End settings on Email & Mobile menu by clicking SAVE SETTINGS

OpenID

Nothing to do some settings here, but there is notification telling you that your blog address can be used as the address of OpenID. What is OpenID? Maybe we will discuss later.

Permissions

On this menu, you can add Authors by inviting them. Just write the email addresses you want them to be the authors of your blog.
At Who can view this blog?, you can choose who can view your blog. If you choose Anybody, your blog can be viewed by public or anybody. If you choose Only people I choose, only invited people who can view your blog that they should login first to view. If you choose Only blog authors, only your blog authors who can view your blog. If you think your blog is not worth publishing as you conduct maintenance, for instance, you can use this option, so only you that can view the blog.
For our discussion on How to do blog settings in blogger seems to come to an end, so what do you think about this?

How to backup your "Widgets"

Be like my promise at my previous post that is i will posting how to backup the data in the widget / page element.

If emerging question do we require to back up the data in page element? the answer is very require to. Because if you change your old template with new template, hence the data in page element will follow to be vanished, and you'd lose all data be like : guest book, blog accessory, blog tool, and also all which have been attached in your blog forever.


Many the way to back up the data in Widgets / page element, but i'm limitation of time to comment it in detail, hence I will try explain just two way, that is backing up directly from Page element and also backup from template source code.


  • Back up widgets From Page Element


  • Back up widgets in this way be in fact very disturbing, however than we lose various accessory and also tool which have been attached, wiser likely to do so.

    Please follow the steps below :

    1. Login to blogger with your ID
    2. Click Layout.
    3. Click menu Page Elemet, you will see the page be like this ( just example):
    4. example for page element
    5. At representative of above seen the article edit which I give red circle, You must click at Edit in each the page element, hence will emerge popup window figuring in the code have in input to that. Pay attention the picture below :
    6. example image for pop up window
    7. Copy the code inside there, and paste to Notepad.
    8. Repeat the step above at all the elements.
    9. Finish.


    There is the step how to back the data inside page element. This is the other way to backup your widgets.


  • Back up widget through Template Source Code


  • I think this way is more quickly and efisian, you need a few time to do this. This is the steps :
    1. Visit your blog address.
    2. After you at your self blog, click the menu View at the bar menu. See the picture below :
    3. this is the example for see the template source code
    4. After click the menu View, will be out the sub menu, then click Source.
    5. if your browser is Internet Explorer, so there is automatically will out the notepad with your template source code. If your browser is Mozilla Firefox or Opera, so there is out the new page with your template source code For example, see the picture below :
    6. the example for source code at the notpad
    7. Save your template source code.
    8. Finish.


    If your question, where is the widgets code? there is always begin with :
    <div class='widget-content'>

    And in terminating with code :
    </div>


    For example, in my template source code. there are code be like this :
    <h2 class='title'>Buku Tamu</h2> <!-- this the title of your widget -->

    <div class='widget-content'> <!-- look at this code -->
    <!-- Begin Shoutbox - http://www.shoutmix.com -->
    <iframe scrolling="auto" width="170" frameborder="0" src="http://www.shoutmix.com/?jaya" height="500" title="jaya">
    <a href="http://www.shoutmix.com/?jaya">View shoutbox</a>
    </iframe>
    <br/><a href="http://www.shoutmix.com" title="Get your own free shoutbox at ShoutMix!"></a><br/>
    <!-- End Shoutbox -->
    </div> <!-- look at this code too -->


    So, my widget code is like this :
    <!-- Begin Shoutbox - http://www.shoutmix.com -->
    <iframe scrolling="auto" width="170" frameborder="0" src="http://www.shoutmix.com/?jaya" height="500" title="jaya">
    <a href="http://www.shoutmix.com/?jaya">View shoutbox</a>
    </iframe>
    <br/><a href="http://www.shoutmix.com" title="Get your own free shoutbox at ShoutMix!"></a><br/>
    <!-- End Shoutbox -->


    I hope with this post you become know how to backup your widget template. So, if you want change your template with a new template. Please don't forget to backup your template and your widgets too.

    In my next post, i will discuss about How to change the template/theme.

    See you in my next post.

    How To Register in Search Engines

    search-engine As we know that the main reasons to write in the blog is that they hope their writing could be read by others or blog visitors. More people or visitors will make us happy and proud, especially when they give some comments on our writing. For making the people come to our blog and then read our postings are not easy. We need high publication in order to increase the traffic.
    We can use many ways to make our blogs famous and get many traffics, such as blog walking or visiting others blogs. Registering to various aggregator, and the most effective ways is through the search engine.
    For new bloggers, they have a wrong assumption. They might think that after making blogs, their blogs will be detected by search engine or listed in all sorts of search engine automatically. The fact is not like that. Like a school, we absolutely have to register in that school so that our name is listed in a student list. Just as a search engine, to make our blog detected by search engine, we have to submit our blogs to some search engines.
    There are many search engines here and recently, the most famous ones are Google, yahoo, and Msn. If we want our blog detected by them, we have to submit our URL blog to them.
    Now, have you submitted your blogs to the search engines above? Or you still don’t know how to submit your blogs. Just follow the tutorials below.
    Sign up in Google
    To register in Google, please visit http://www.google.com/addurl/, and if you are in registering page, you must fill in available form;
    • URL --> Fill in your URL blog
    • Comments --> Fill in the related keywords to your blogs.
    • Fill in the blank square with the verification code available.
    • Click Add URL.
    • Finished
    As soon as your submission to Google, it doesn’t mean that your blog would have an index in Google search engine. It will need about 3 until 4 weeks for new blog to be able to have an index. After 3 or 4 weeks, try to type your URL blog in Google search engine. If your blog still can not be detected, you will have to wait for a couple of week again. If it is not detected yet, you must submit your blog again as the steps above.
    Or, you might not be patient and want your blog detected soon by Google search engine. Actually, it could happen only in 3 or 4 days. Would you like to know how? Just read my upcoming post in 1 or 2 days…ok.
    Register in yahoo
    In order to register in yahoo, please visit this site https://siteexplorer.search.yahoo.com/submit. Before registering here, make sure that you have yahoo account. Why you need yahoo account? Because to register here, you need to log in to your yahoo account. If you still don’t have any yahoo e-mail, click here to make one first. And if you have e yahoo account, you just need to log in with your username and password. As soon as you log in, you will see a column. Just fill in the column with your URL blog, then click Add URL and done.
    If you want to add your feed address too, you can do it here. Remember, you only need to add atom.xml behind your URL blog in order to get feed address of your blog, example; this blog blog has feed address as follow; http://kolom-tutorial.blogspot.com/atom.xml.
    Register in Msn
    Please visit http://search.msn.com/docs/submit.aspx?FORM=WSDD2 to register in Msn. Just fill in the verification code and your URL blog in the available square, then click submit and finished.
    If you want more search engines and your URL blog can be detected by many search engines, you can use submitter site. Now, click the banner below

    clip_image001
    Your job is only adding your URL blog, and then writes your e-mail. Then click Submit Your Site.
    If your blog wants to be more famous, try to do ping to various aggregators, just click the lick below:
    Ping-O-Matic
    You simply fill in the available form.
    Now, has your blog been detected by Google? Try to add your URL address in search engine at the top of this blog!!!

    Tutorial in creating blog in Blogspot

    1. What is Blog?

    Blog is short for "Web log", which is a a web application containing note or writing that are usually called "post" and displaying on the web pages. The posts are often displayed orderly based on the age or based on the time when the writing is written and published, so when you view a blog, you will first find the latest posts, top to bottom of the web page and the first to the last page, if the blog has had more than one web page.
    For the first time, blog was created as the online private notes, but along with its development and popularity, blog has various types of contents or writings such as tutorial (e.g. this blog), sharing, business, etc. In general, blogs seem not to have the difference with the sites on the Internet.
    The blog platform or used to be called blog machine has been created in such a way by blog designers or developers in order to be user friendly, so the knowledge of HTML, PHP, CSS, etc that was a must to create a web application, now with blog, everything is so easy as 1, 2, 3.

    2. How to create blog in blogspot

    One of the free blog providers that is quite popular today is blogspot or blogger, where you have to register through blogger.com and you get the domain name as sub domain of blogspot, e.g. yourname.blogspot.com.
    Why should you create blog in blogger.com, not in other free blog providers? Actually, there is no “should”, but blogger.com has more advantages than other providers do. One of the advantages is the easiness in operating so that blogger.com is good for the beginners. Other advantages are the freedom in editing and replacing the templates to make the best display, custom domain which means that you can replace the domain with your own but with the blogspot hosting, e.g. yourname.blogspot.com can be changed into yourname.com, but still in the same hosting, i.e. the free blogspot hosting.
    It should be emphasized from the beginning that the Internet is highly dynamic, so it is very possible that this practical guide to create blog in blogspot will not be relevant anymore as changes occurring, whether to the platform, coding, or anything else that you see right now in blogger.com
    To reduce something unneeded to write, below is how to create blog in blogger.com.

    Creating Email

    One of the conditions required in creating blog is to have an active email address. If you do not have an email, please register at gmail. Since Blogger is one of Google services, when you want to register at Blogger, you had better use Google Email or gmail. If you need a simple guide to create an email, please use Google search engine to search for the best guide.

    Sign up for a blog at blogger 

    1. Please visit http://www.blogger.com
    2. After registration page open, go to the right bottom of the page where you can change the language to your own to make you easier to understand the instructions, but in this tutorial, I use English for more global targeting. Please login by using your username and password of your gmail (your email account is allowed to use for login to blogger). login t -blogger
    3. Click "CREATE A BLOG" button
    4. Enter your Blog Title in the field next to "Blog Title", and your expected blog address in the field next to “Blog address (URL). Need to remember that when you enter your expected blog address, you have to be sure of it as you cannot replace it in the future, except you use Custom Domain facility. Check for the availability. If your expected blog address is not available, replace with your new one and so on until you get it. Then type the character you see next to "Word verification", below blog address point and click CONTINUE for the next steps. name-your-blog
    5. Choose a starter template, meaning that you can replace this template in the future and then click CONTINUEchoose a starter template
    6. You will see "Your Blog has been created!" meaning that now you have a blog and you are ready to start Blogging, by clicking "START BLOGGING".  start blogging
    7. You will soon be in the post editor, where you can write anything as you may have thought about before. (it is recommended to directly write for your first post to avoid "Blogger Anti-Spam Robot" that can result in your blog locked. For instance, you can write a very short entry if you have not prepared an entry: "Hello World!", and anything else you want. Click "PREVIEW" button to view how your post will be displayed, then click "PUBLISH POST" if you want your entry to be published. post-editor
    8. Click "View Post" to see your blog. Below is the example of the blog display created
    9. Done
    For the first phase, your blog is ready and accessible for public. For next discussions about blogging in blogger are to come.

    Cara Mendaftar Facebook

    facebook logoSaat ini Facebook menjadi situs jejaring sosial (social networking) terpopuler di Indonesia. Facebook mengalahkan situs jejaring sosial lain seperti Friendster, Multiply dan Myspace. Facebook memiliki keunggulan lain dibanding pesaingnya dengan memiliki fitur menarik seperti : menampilkan status tebaru, membuat halaman sendiri, privasi yang dapat diatur dan dapat menjadi sarana promosi gratis (internet marketing). Saat ini Facebook memiliki anggota lebih dari 300 juta orang di seluruh dunia. Angka yang fantastis bukan?

    Untuk mendaftar Facebook sangatlah mudah, berikut langkah-langkahnya:

    1. Buka situs Facebook di http://www.facebook.com Simpan artikel ini dalam bentuk PDF disini.
    2. Ubah bahasa menjadi Bahasa Indonesia untuk memudahkan pemahaman. Klik bahasa pada bagian kiri bawah. Pilih Bahasa Indonesia.
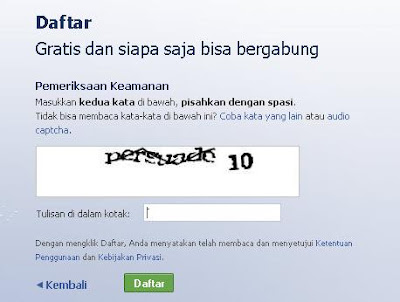
    3. Isi data kamu dengan lengkap pada kolom daftar isian. Klik tombol Mendaftar. Kemudian akan muncul halaman Pemeriksaan Keamanan. Isi kode keamanan yang diberikan, dipisahkan dengan spasi, jika tulisan susah dibaca klik "Coba kata yang lain" atau "pilih captcha suara". Klik Mendaftar sekali lagi.
    4. Muncul halaman baru berupa Langkah 1, Langkah 2 dan Langkah 3. Isi password email anda pada Langkah 1 untuk mencari daftar teman dalam Email kamu yang sudah mendaftar facebook. Langkah 2 isikan data sekolah dan perusahaan jika sudah bekerja atau lewati untuk menuju Langkah 3. Pada Langkah 3 upload foto kamu dari komputer atau bisa juga menggunakan webcam jika ada, simpan dan lanjutkan atau kamu bisa lewati untuk langsung menhuju halaman utama facebook.
    5. Periksa email yang kamu gunakan pada saat mendaftar. Klik tautan (link) yang di kirim Facebook. Tautan ini digunakan untuk verifikasi email yang kamu daftarkan valid atau tidak.
    6. Login menggunakan email dan password kamu.
    7. Setelah masuk halaman utama dan email sudah terverifikasi tambahkan koleksi foto kamu dan isi profile kamu secara lengkap untuk memudahkan pencarian oleh teman-teman kamu.
    8. Atur privasi kamu agar siapa saja yang bisa melihat profil kamu di menu Akun | Pengaturan Privasi.
    Selamat bergabung dengan facebook dan gunakan dengan bijak dan semoga bermanfaat!


    facebook logo


    Gambar tampilan halaman depan Facebook. (1)


    facebook page


    How to Register and Join Facebook

    Facebook is a popular social networking site that allows you to connect with friends, school and business contacts. Facebook is open to everyone. However, you must register to access an account. Complete these steps to register and join Facebook.
    Difficulty: Easy

    Instructions

    1. 1
      Visit Facebook online. Access the website homepage, click on the "Sign Up" button to be taken to a form to register.
    2. 2
      Enter in your full name, a valid email address and birthday. Add in your status for high school, college/graduate school or work in the "I am" section. For unaffiliated registration select "None of the above."
    3. 3
      Choose a password. Enter in a unique password that is easy to remember. Facebook requires creation of a password of at least six characters.
    4. 4
      Complete the security check. Identify the words or numbers used and type them in.
    5. 5
      Read the "Terms of Use" and "Privacy Policy." Check the box to mark your agreement with the terms of both.
    6. 6
      Click on the "Sign Up Now!" button at the bottom of the page. Wait for redirection to a thank you page.
    7. 7
      Go to your email inbox and click on the confirmation page from Facebook. Follow the email link to confirm your registration. Check spam and junk mail folders if the confirmation email can't be located.
    Download Friendchat Dari Ovi Store & Nikmati Fitur Chat Dengan Gratis!

    Get Advice From Famous Orthopaedic Doctor Dr.Kevin Yip. Register Now!

    Get 1000's of real fans for your FB pages. Free to use.

    Small - Large fixes, Cheap & Mobile Servers, Desktops, Networks


    Read more: How to Register and Join Facebook | eHow.com http://www.ehow.com/how_2210829_register-join-facebook.html#ixzz18yQewiod

    How to Manually Update AVIRA

    Avira GmbH is a German antivirus software company. Its antivirus applications are based on the AntiVir scan engine also known as "Luke Filewalker", first launched in 1988. It was called "H+BEDV Datentechnik GmbH" when it was founded. Avira AntiVir Personal - Free Antivirus is free for personal use. Avira's engine has been licensed to Ashampoo antivirus and Webroot WebWasher.
    Avira AntiVir PersonalEdition Classic is a comprehensive, easy to use antivirus program, designed to offer reliable virus protection to home-users only.
    Avira PersonalEdition Classic constantly and rapidly scans your computer for malicious programs (such as viruses, Trojans, backdoor programs, hoaxes, worms, dialers etc.), monitoring every action executed by the user or by the operating system and being able to react promptly when a malicious program is detected. Actions include repair, delete, block, rename and quarantine programs or files.
    Avira PersonalEdition Classic also features enhanced protection against unknown boot-sector viruses, issuing alerts for boot sectors suspicious formats. Through the permanent update of the detection engine, the protection is ensured constantly: the user can set the product to download any updates when available, thus keeping you clean and safe.
    Download the Virus Definition File to always keep Avira AntiVir up-to-date.
    Manual Update of AntiVir
    Steps on how to update AntiVir Avira:
    · Download the latest virus definition file (IVDF) on a PC with internet access.
    · Copy the downloaded file to a portable media storage such as an USB Stick or a CD-ROM for transferring it to the PC without internet access. Note: Extracting of the ZIP file is not necessary.
    · Insert the media storage into the PC without internet access.
    · Start AntiVir Personal Edition Classic / Premium and go the menu Update" and select Manual Update".
    · Select the downloaded IVDF file from your media storage and click open".
    Your AntiVir PersonalEdition Classic / Premium is now up to date.

    To download Avira Free click here
    To download Update Avira click here

    Cara Download di Indowebster

    1. Cara Register
      Bisa dilewat kalo sudah punya id indowebster.com
      Spoiler untuk register 1:


      Spoiler untuk register 2:
    2. Cara Download untuk member non VIP
      1. masuk ke link yang mau didownload, misalnya Film Doraemon 2009
      2. cari kotak Download Link (lokasinya di atas button report)

        Spoiler untuk download 1:

      3. copy paste ke address bar browser anda atau klik button copy

        Spoiler untuk download 2:

      4. linknya akan nge-direct ke article kan? :onion-08: nah scroll ke bagian agak bawah, ada button Click Me - Supported by IDWS >> click buttonnya

        ada yang gak nemu button click me nya? >> coba install flash player dan juga enable cookie di browser


        Spoiler untuk download 3:

      5. beres deh, download-an langsung jalan :th_101_:
    3. Cara Download VIP member
      Untuk VIP gampang banget, gak pake ribet tinggal Login trus klik button Download *cuma ada untuk VIP member*
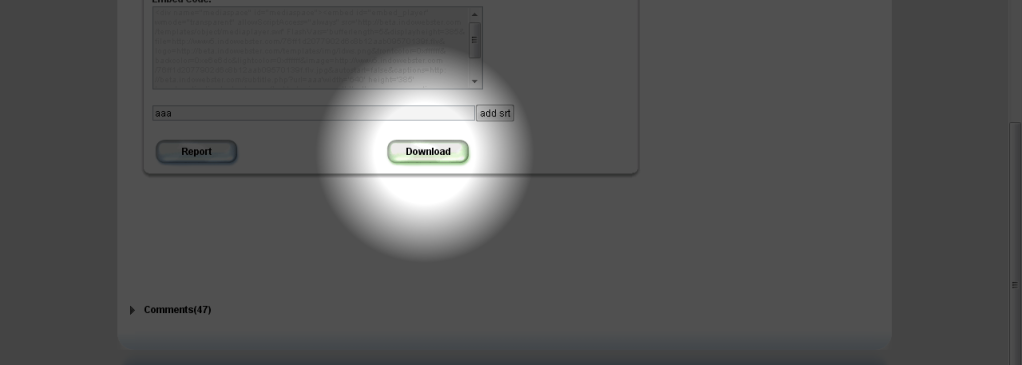
      cara jadi VIP disini >> http://www.indowebster.web.id/payments.php


      Spoiler untuk download vip:


    gimana? gak ribet deh, cuma tambah beberapa step, idws masih tetep gratis kan


    tetep gak mau ribet? jadi VIP ajaaaa~

    Meningkatkan hasil Google Adsense kita

    Bagi para blogger yang memiliki web/blog bertraffic rendah mungkin selalu bertanya dalam hati, mengapa website / blog anda belum memberikan hasil / pendapatan maksimal kepada anda walaupun anda sudah serius ngeblog ?

    Oya, jika anda belum tahu apa itu Google Adsense, saya kasih tahu, secara garis besar Google Adsense adalah salah satu cara mencari uang di dunia internet yang sudah terbukti kredibilitasnya, kalau sudah tahu, kenapa tidak dari sini ?

    Sebenarnya tulisan artikel ini membahas cara terbaik menaikkan / meningkatan pendapatan blog anda dari hasil iklan secara umum (tidak spesifik untuk Google Adsense, bisa dari pendapatan / income melalui iklan seperti Bidvertiser,Adbrite,Oxado,Adengage), tetapi karena terlanjur terkenalnya Adsense,
    saya memberikan judul diatas.

    Dulu, setelah saya berhasil di approve Google Adsense menjadi publisher mereka, begitu senangnya saya dan saya selalu memikirkan cara cepat alias shortcut untuk cepat meraih keuntungan dari hasil iklan tersebut, tetapi selalu gagal dan gagal. Saya sering bertanya, mengapa trafficnya begitu minim sehingga iklan Adsense saya tidak diclick sama sekali?
    Akhirnya saya menemukan jawabannya, saya terlalu fokus dengan website yang berisi ADSENSE,
    sedangkan kita tahu bahwa iklan Adsense hanya akan muncul jika artikel yang kita tulis adalah dalam bahasa inggris (syukur-sykur mau nongol di artikel bahasa indonesia).
    Jadi kesimpulannya content website saya menggunakan bahasa inggris, sedangkan google page rank masih 0,
    sedangkan kita tahu bahwa sangat sulit berkompetisi dengan website-website luar yang juga berbahasa inggris (boro-boro bersaing dengan website / blog luar, bersaing dengan blog lokal saja kalah telak).

    Akhirnya, saya menemukan jawabannya, bikin satu blog khusus lagi sebagai perantara sebagai medium untuk
    mempromosikan website / blog kita yang berisi iklan-iklan yang kita harapkan bisa menjadi tumpuan kita untuk mencari nafkah di dunia internet ini.
    Dan kemudian akhirnya berhasil, pendapatan dari internet akhirnya terdongkrak, baik iklan Adsense, etology, adengage, bidvertiser, exoclick, adbrite,
    semua memberikan hasil yang baik. Bahkan referral saya sebagai publisher Adsense sudah mencapai 30 orang dalam 1 bulan ini.

    Lalu apa kriteria blog perantara yang saya maksudkan ?
    blog perantara yang saya maksudkan disini tidaklah muluk-muluk, isilah dengan santai artikel-artikel apa saja, dengan content yang padat, boleh berbahasa indonesia, tata ruang yang baik (themes yang enak dilihat, font yang cukup proposional,perpaduan warna yang menarik,pernak-pernik seadanya),
    isinya memberikan manfaat kepada orang lain, juallah skill dan kemampuan anda, buatlah visitor merasa ingin berkunjung terus alias penasaran,
    jangan membombardir blog anda dengan banner-banner, pernak pernik blog yang menghabiskan bandwidth koneksi internet mereka,
    dengan kata lain, blog tersebut berisi content yang simple,padat,mendidik dan menarik dan isinya akan dapat di cari di search engine.

    Tentunya yang lebih penting lagi, di dalam blog perantara ini berisi link ataupun banner yang menarik pengunjung untuk mengclick LINK / BANNER yang nantinya akan
    menuntun / memforward visitor kita menuju blog “komersial” anda tersebut.

    Jika sudah begitu, kemungkin visitor / pengunjung blog / website anda untuk mengclick iklan di blog komersial anda tersebut lebih besar bukan,
    apalagi kalau anda bisa menyiasati blog komersial anda dengan baik, saya yakin pendapatan anda dari iklan juga akan terdongkrak.

    Jadi skema sederhananya akan tampak seperti ini :

    Visitor - > Search Engine - > blog perantara anda - > Blog Komersial.

    Tetapi semua kita kembalikan kepada visitor anda apakah mereka akan mengclick iklan atau tidak.

    Pasang Banner Dapat Uang

    Peluang mencari uang di internet semakin hari semakin banyak saja mulai dari pasang iklan di blog, sharing file dapat uang, survey dapat uang, kontes refferal hingga pasang banner juga dapat uang. Nah sekarang yang akan saya bahas adalah pasang banner. Nah Di sini kita mendapatkan uang hanya dengan memasang kode HTML yang di berikan oleh mereka di blog atau website kita. Nah kita akan mendapatkan uang setiap kali banner tersebut tampil dan di lihat. Nah kekurangan dari penghasil uang ini syaratnya adalah anda mempunyai blog bahasa inggris atau blog yang mayoritas pengunjungnya dari amerika, kanada, inggris atau eropa barat sana. Tapi tenang di bawah saya memberikan tips untuk mendapatkan pengunjung dari luar negeri dengan mudah, Nah di sini saya akan sedikit mereview 3 situs yang menyediakan layanan ini. ini dia situsnya:
    Paid to promote ini adalah situs pasang banner pertama yang saya ikuti, saya sudah mendapatkan 3 kali pembayaran dari mereka. Situs ini memiliki minimum payout paling kecil yaitu $0.1 dan di bayar 1 bulan dua kali yaitu setiap tengan dan akhir bulan. Pembayaran mereka lakukan ke paypal anda, jika anda belum mempunyai paypal silahkan daftar paypal dulu. Nah situs ini hanya menghitung pengunjung yang berasal dari  United States, Canada, Australia, United Kingdom, Austria, Belgium, Denmark, Finland,  France, Germany, Iceland, Italy, Netherlands, New Zealand, Spain saja. Rate pendapatan dari situs ini tidak terlalu jelas, saya rasa ari situs ini kita akan mendapatkan $1 setiap 1000 kali tampil atau $1 CPM.
    Situs ini saya rekomendasikan untuk anda karena di samping telah terbukti membayar juga sangat mudah pendaftaran dan pemasangan kodenya. Nah anda berminat? silahkan daftar sekarang di paid to promote.net

    Daftar Trading in FXOpen

    Tata cara dan aturan untuk bisa bermain trading forex di FXopen adalah syarat utama scan KTP asli dan scan rekening listrik yang alamatnya sesuai KTP, jika tidak ada rekening listrik bisa diganti rekening koran Bank Anda 1 bulan terakhir.
    Bagi yang ingin mendaftar trading forex di FXOpen berikut saya kasih panduannya. Untuk memulai pendaftaran silahkan terlebih dahulu klik DISINI.
    Setelah terbuka website fxopen silahkan ikuti petunjuknya yang berbentuk ebook dan bisa di download klik DISINI.
    Kemudian setelah proses pendaftaran selesai dan account Anda sudah di approve oleh admin FXOpen Anda bisa langsung mendownload software MetaTrader MT4 DISINI.

    SEVEN SEGMENT CIRCUIT

    The IC 4511 is a BCD to 7-segment decoder driver. Its function is to convert the logic states at the outputs of a BCD, or binary coded decimal, counter like the 4510 into signals which will drive a 7-segment display. The display shows the decimal numbers 0-9 and is easily understood.


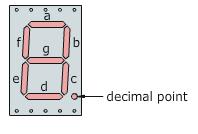
    7-segment display


    There are two important types of 7-segment LED display. In a common cathode display, the cathodes of all the LEDs are joined together and the individual segments are illuminated by HIGH voltages. In a common anode display, the anodes of all the LEDs are joined together and the individual segments are illuminated by connecting to a LOW voltage.

    The 4511 is designed to drive a common cathode display and won't work with a common anode display. You need to check that you are using the right kind of display before you start building.

    The 0.56 in. 7-segment display common cathode available from Rapid works well as part of a prototype board circuit.

    When the 4511 is set up correctly, the outputs follow this truth table:

    In normal operation, the lamp test and ripple blanking inputs are connected HIGH, and the enable (store) input is connected LOW. The circuit diagram shows the 4511 and a 7-segment common cathode display connected to the outputs of a 4510 BCD counter:

    To build this circuit follow the prototype board layout from the 4510 Beastie Zone web page and then add the 4511 with connections to a third prototype board, as shown below: